KitchenAid Instant Hot Hot Water Dispenser User Manual
Browse online or download User Manual for Water dispensers KitchenAid Instant Hot Hot Water Dispenser. KitchenAid Instant Hot Hot Water Dispenser User's Manual
- Page / 32
- Table of contents
- TROUBLESHOOTING
- BOOKMARKS
- Installation Instructions 1
- Use and Care Guide 1
- Table of Contents 2
- Hot Water Dispenser Safety 2
- Parts and Features 3
- Before You Start 4
- Before You Start cont 5
- 3.Remove masking tape and tag 6
- 4.Lay spout assembly on flat 7
- 11.Turn saddle valve handle 8
- 13.Connect water supply line 9
- 14.Turn Temperature Control 9
- 15.Push down and turn the 9
- Before using the first time 10
- Temperature control 10
- Hot water dispenser uses 10
- Dispensing hot water 10
- Troubleshooting 12
- If you need replacement parts 13
- For further assistance 13
- INSTANT HOT 15
- Water Dispenser Warranty 15
- Note à l’utilisateur 17
- Table des matières 18
- AVERTISSEMENT 18
- Pièces et caractéristiques 19
- Avant de commencer 20
- 3.Enlever le ruban adhésif et 22
- 7.Positionner le réservoir 23
- 9.Connecter le tube flexible 24
- 10.Installer l’ensemble 24
- 11.Faire tourner dans le sens 24
- 13.Exécuter le raccordement 25
- 14.Placer le bouton de la 25
- 15.Pour ouvrir le robinet 25
- 16.Brancher le cordon 25
- Avant l’utilisation initiale 26
- Commande de la température 26
- Distribution d’eau chaude 26
- Diagnostic 28
- Pour plus d’assistance 30
Summary of Contents
A Note to YouThank you for buying aKitchenAid®appliance.KitchenAid designs the best tools for themost important room in your house.Toensure that you e
10Instant foods that require only 190°F (88°C) water for complete preparationinclude:Preparing instant foods and drinksCooking shortcuts190°F (88°C) w
111. Turn Temperature Control to the “Off” position. Push down and turn On/Off Cap clockwise and run water until it is cold to avoid possibility of bu
12Has circuit breaker tripped orhouse fuse blown?Is power supply cord pluggedin?Is the Temperature Control setto the “Off” position?Has the water supp
13Call the KitchenAid Customer Interaction Center toll-free at 1-800-422-1230 or visitwww.kitchenaid.com. Our consultants are available to assist you.
142. If you need service✝...Contact your nearest KitchenAid Canada ApplianceService branch or authorized servicing outlet to service your appliance. (
KITCHENAID AND KITCHENAID CANADA DO NOT ASSUME ANY RESPONSIBILITY FOR INCIDENTAL ORCONSEQUENTIAL DAMAGES. Some states or provinces do not allow the ex
PART NO. 3193348Pièce N° 3193348©2001 KitchenAid, U.S.A.®Trademark of KitchenAid, U.S.A., KitchenAid Canada licensee in Canada.®Marque de commerce de
Note à l’utilisateurNous vous remercions de votreachat d’un appareil ménagerKitchenAid®!KitchenAid conçoit les meilleurs outilspour la pièce la plus i
Table des matières2Note à l’utilisateur CouvertureSécurité du distributeur d’eauchaude . . . . . . . . . . . . . . . . . . . . .2Pièces et caractérist
Pièces et caractéristiques3Utiliser cette illustration dudistributeur d’eau chaude pourapprendre rapidement commentinstaller et utiliser votre nouveau
Table of Contents2A Note to you . . . . . . . . . . . . CoverHot Water Dispenser Safety . . . . 2Parts and Features . . . . . . . . . . . 3How your ho
Avant de commencer4Prise de courantélectrique, située àmoins de 106,7 cm (42 po) du réservoir du distributeur d’eauchaude.On doitinstaller leréservoir
Avant de commencer - suiterègle ou mètre-rubanpincetournevis àlame plateOutillage et matériauxnécessaires pour l’installationPièces fournies clé(s) pl
Instructions d’installation61.Porter des gants et des lunettes de sécurité.2.Déterminer à quel emplacementle distributeur d’eau chaude serainstallé. I
Instructions d’installation - suite7bride5,7 cm(2-1/4 po)7.Positionner le réservoirverticalement sous le robinet depuisage, de telle manière que le tu
Instructions d’installation - suite89.Connecter le tube flexibleprovenant du robinet au centre duréservior au moyen de la bride.Veiller à ce que le tu
Instructions d’installation - suite9tube decuivreraccord rapidecanalisationd’eaurobinet/bride debranchement13.Exécuter le raccordemententre le robinet
Utilisation de votre distributeur d’eau chaude10Les aliments instantanés nécessitantune eau à 88°C (190°F) pour unepréparation complète comprennent :P
Entretien de votre distributeur d’eau chaude11Nettoyage du filtre du robinetSi vous avez une eau très dure etremarquez que le débit d’eau estréduit, i
Diagnostic12Un fusible est-il grillé ou ledisjoncteur est-il ouvert?Le cordon d’alimentation électrique est-il branché?La commande de la température e
Demande d’assistance ou de service13Contacter sans frais le centre d'assistance auxconsommateurs de KitchenAid au 1-800-422-1230,ou consulter l’i
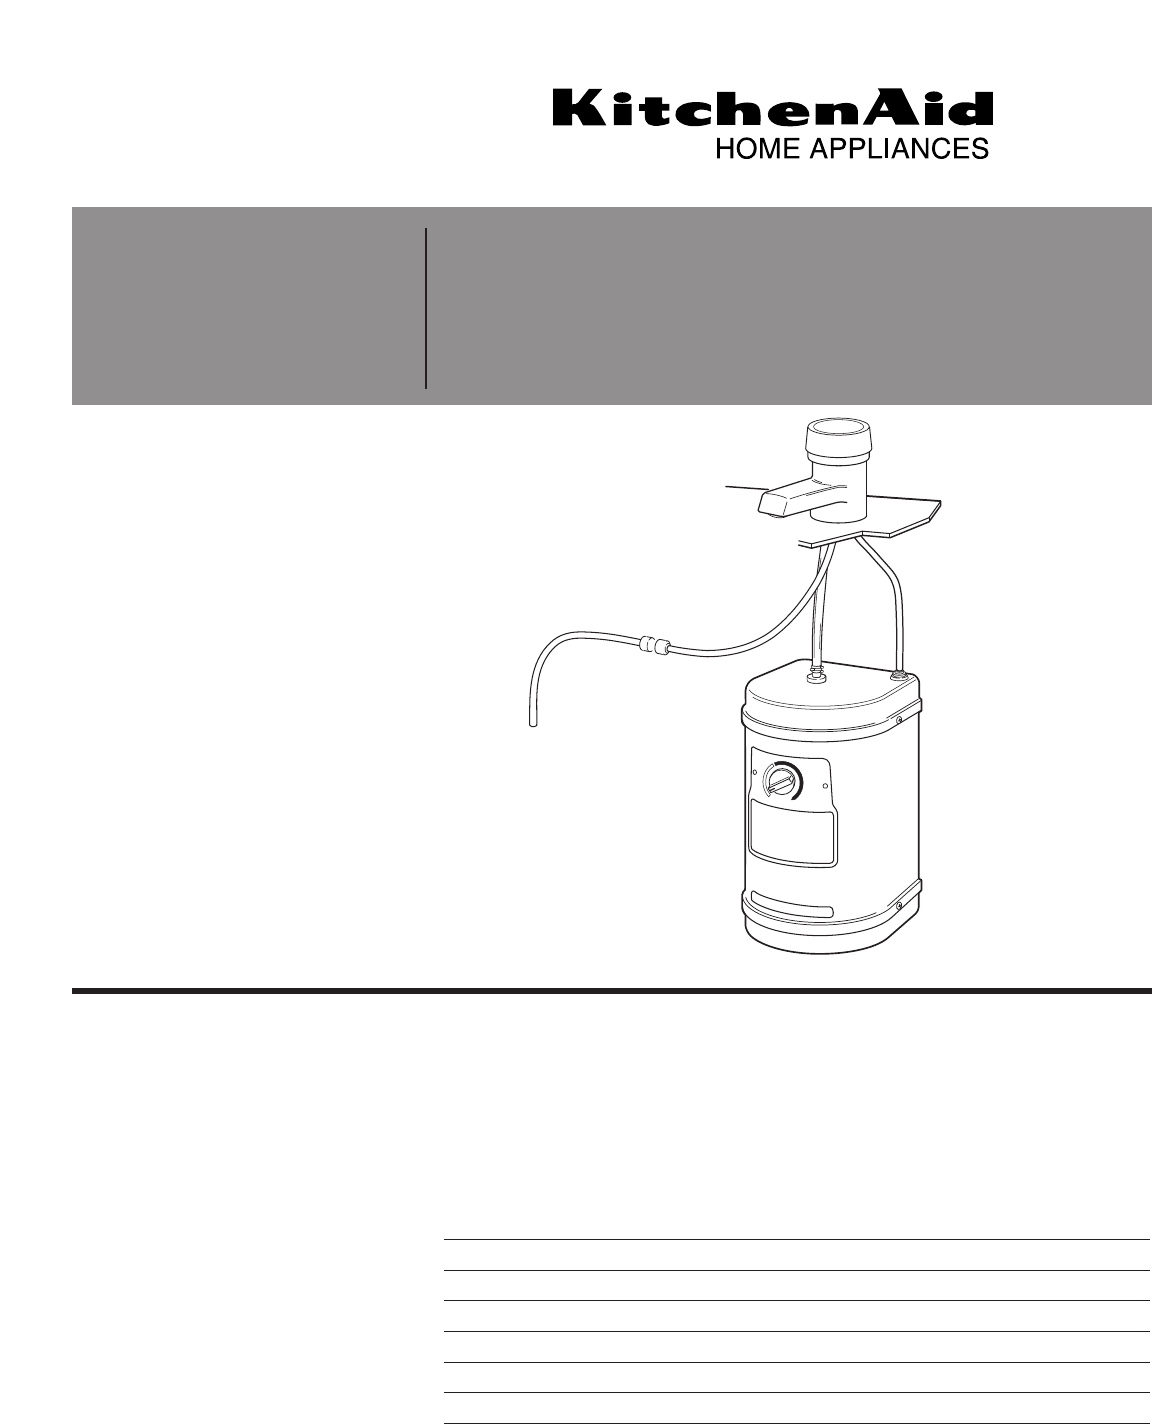
Parts and Features3Use this hot water dispenserillustration to help you quickly learnhow to install and use your new hotwater dispenser. Page numbers
142. Si vous avez besoin de services de dépannage✝...Contactez la plus proche succursale de service deKitchenAid Canada ou un centre de service autori
®KITCHENAID ET KITCHENAID CANADA DÉCLINENT TOUTE RESPONSABILITÉ AU TITRE DE DOMMAGESSECONDAIRES OU INDIRECTS. Certaines provinces n’admettent pas l’ex
Part No. 3193348Pièce N° 3193348©2001 KitchenAid, U.S.A.®Trademark of KitchenAid, U.S.A., KitchenAid Canada licensee in Canada.®Marque de commerce de
Before You Start442" (106.7 cm) max. —electrical outlet to hotwater dispenser tank.Tank must bemountedvertically.Spout installed in spray hoseope
Before You Start cont.ruler or measuring tapepliersflat-bladescrewdriverTools and materials neededParts suppliedopen-end wrench(es)to fit saddle valve
62.Determine where you will installyour hot water dispenser. Checkbelow sink to assure that reinforcingribs, support brackets or cabinetconstruction w
77.Position tank vertically beneathspout so that flexible tubing fromspout reaches center stainless tubingon tank, and tank touches wall. Use apencil
89.Connect flexible tubing fromspout to center tank tubing usingclamp. Make sure flexible tubingdoes not kink.The flexible tubing may be shortenedif n
9coppertubingquick-connectfittingwater supplylinesaddlevalve13.Connect water supply linefrom saddle valve to spout coppertubing with the factory-assem
© 2020, manymanuals.com. All rights reserved. | 0.071 s |
 Manymanuals.com
 Manymanuals.de
 Manymanuals.fr
 Manymanuals.it
 Manymanuals.pl
 Manymanuals.cz
 Manymanuals.es
 Manymanuals-pt.com
Comments to this Manuals